Dialog Compression: The BX Console N Compressor Pt.4
[ Hear audio example in blue box ]
Can I interest you in an adaptable compressor for dialogue that gives you a clear, up front sound without adding any distortion?
What if the compressor is easy to use AND comes with a host of tools for cleaning, sculpting, correcting and sweetening your dialogue?
Alright then!
Let's learn to use the excellent sounding compressor in the plug-in that's a Swiss Army Knife for improving your dialogue recordings.
That would be the Brainworx bx_console N channel strip from Plugin Alliance.
What It Does
As we explained in an earlier post, you can use this compressor for leveling duties on your spoken word recordings.
The compressor in the bx_console N smooths out the high and low spots in your dialogue for a more consistent sound that your listeners will appreciate and expect.
Shortly after recording, you can run your audio through this compressor (and through any of the other tools included in the channel strip).
This results in stabilizing and controlling the volume of your dialogue while also sweetening its sound.
Along with leveling, the compressor lends some subtle saturation and tone-shaping to your spoken words giving a more direct or immediate sound.

[ Compressing Dialogue in Brainworx Console N ]
Listen to the audio example (at top of page in blue box) to hear my dialogue BEFORE and AFTER using the compressor:
- the audio examples are volume matched to each other for an accurate comparison (i.e. you won't be fooled by louder audio sounding better)
- you'll hear 16 seconds of dialogue BEFORE compression and 16 seconds of dialogue AFTER compression (this sequence will repeat 1 time)
- are there any differences you notice between the 2 examples?
- ***the differences will be subtle, so try to use your best headphones or speakers***
The differences between these two examples are extremely subtle, so don't beat yourself up if you can't hear it!
I can barely hear the differences, but turning the volume up quite a bit on my best headphones does help.
If you're having trouble hearing a difference, listen for a slightly clearer, less bass-heavy and "closer" sound in the AFTER audio (compared to the BEFORE audio).
This is probably the very slight tonal enhancement that this particular compressor lends to your spoken word recordings when used with the filters.
I know this because I purposefully chose to not use the saturation setting (called THD) that's included with the various tools in this plug-in.
I'm using only the compressor and the filters (high pass and low pass) with everything else turned off or turned to zero.
[ Filter Section Working with the Compressor ]
I wanted to demonstrate what the compressor sounds like on its own without the other tools in the plug-in.
Nevertheless, you would normally use all the various tools like EQ, noise gate, THD saturation, and the compressor together as a whole for sculpting your dialogue.
Consequently, any tonal enrichment you hear is only coming from the transparent sounding compressor used with the high pass and low pass filters.
These filters are filtering out very high and low sonic material that isn't useful for spoken word recordings.
I highly suggest using the filters while compressing with this plug-in (at least for lower voices).
Otherwise the compressor ends up sounding too boomy or bass-heavy (something like the proximity effect).
Finally, if you'd like to learn to use the wonderful sounding EQ on this plug-in, check out this series on EQ (scroll down for Steps 1 - 3).
And to learn how to use the noise gate feature on this same plug-in, check out this post.
How To Use It
Here's how I'd typically set up the compressor in the bx_console N for my voice-over for a YouTube video (or a podcast or audiobook for leveling duties).
Remember, I'm only demonstrating the compressor and the tools that work with it below.
In practice I'd be using most or all of the tools together on the channel strip to run my raw recording through for overall cleaning and sculpting.
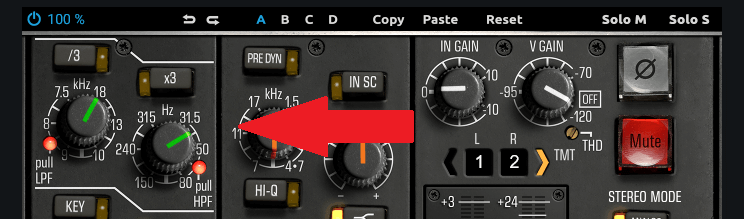
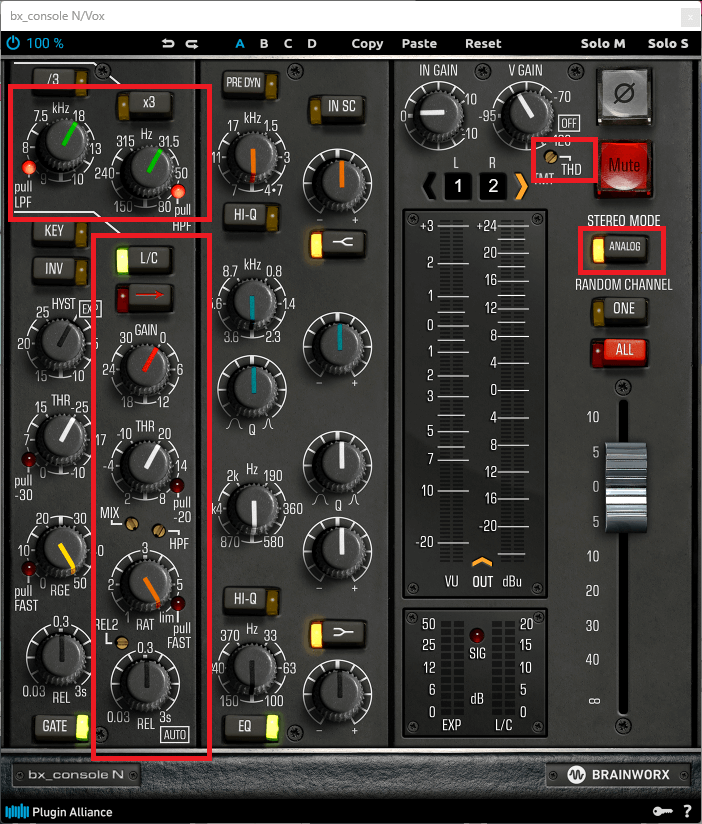
1. Here's what the plug-in looks like when I pull it up in its default state. However, we're only using the tools in the red boxes, so we'll need to turn off all the other tools:
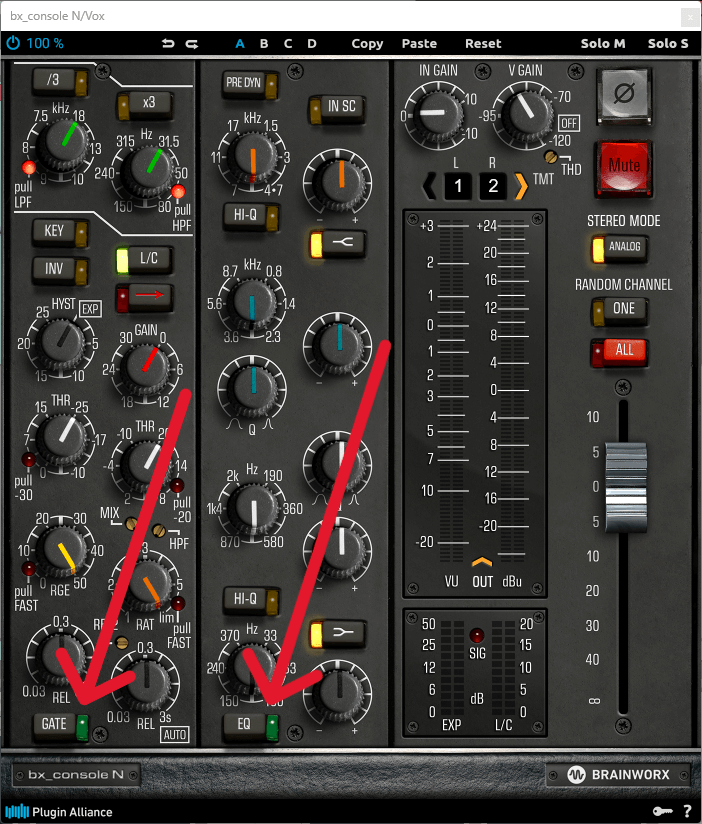
2. Turn off the "Gate" and "EQ" tools / sections by clicking on the buttons below (lights should be off):
3. Next, turn off the "V Gain" by turning the knob counterclockwise to the "Off" position (around 4 o'clock):

4. Now we'll set the "THD" which is saturation for enhancing the tone of your dialogue (the screw right next to the "V Gain" knob):
-- I like to use a little of this coloration at this stage since I know I won't be adding a lot of saturation through the editing process later...
-- conversely, if you know you'll be using processing that adds saturation down the line (e.g. compression during mastering)...
-- you may choose to turn this off since, most importantly, dialogue needs to sound clear...
-- to set the "THD" click on the tiny brass screw and pull "down" with your mouse to around -85 dB for very light enhancement (it's at -60 dB by default)
![]()
5. The next tool, "Stereo Mode" is extremely subtle and will likely work how it's set in default on "Analog":
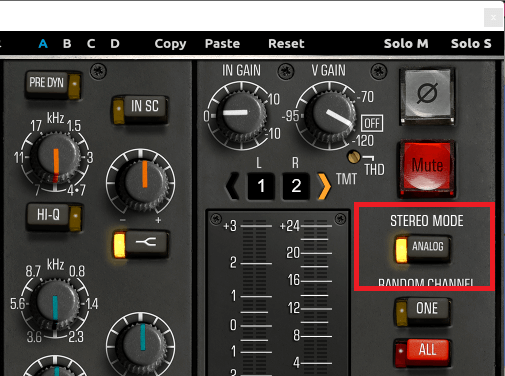
-- it doesn't seem to make a mono recording from a microphone (your dialogue) obviously stereo, but it does add something small...
-- however, if you need your audio to be mono (you're doing audiobooks or dialogue only podcasts / voice-overs), you can turn this off and it will display "Digital"...
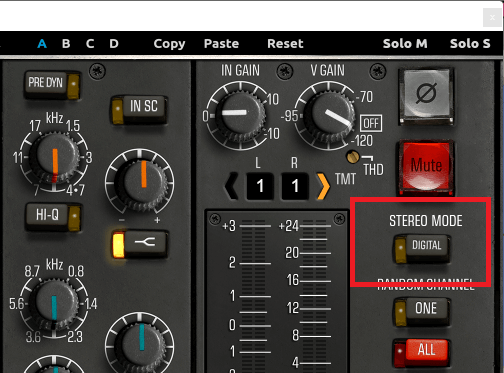
-- otherwise, I've had no problems leaving this on "Analog" for my voice-overs for video - in fact, I like the tiny enhancement it adds to the spoken words
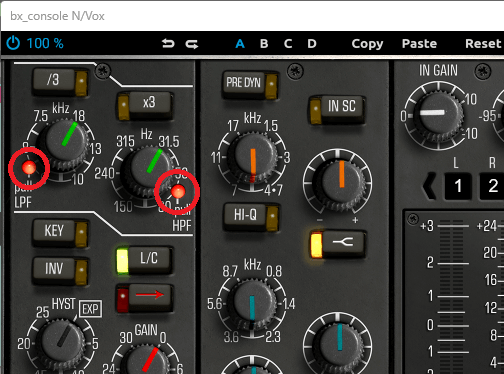
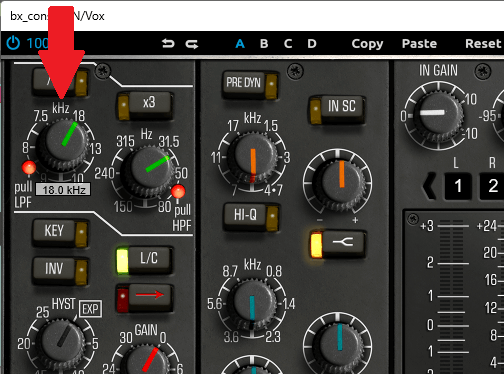
6. Now that we've turned off everything we're not going to use, let's set the high pass (HPF) and low pass (LPF) filters:
-- these are essential for getting the compressor to give you a clear and focused sound to your dialogue...
-- first, check to see that both red lights are "on" (click on red lights to turn "on")
-- then, click on the knob on the right (the "HPF") and move the knob clockwise by pulling "up" on your mouse...
-- set the "HPF" to around 40.0 Hz (meaning frequencies higher than this will pass through; those lower will be cut)
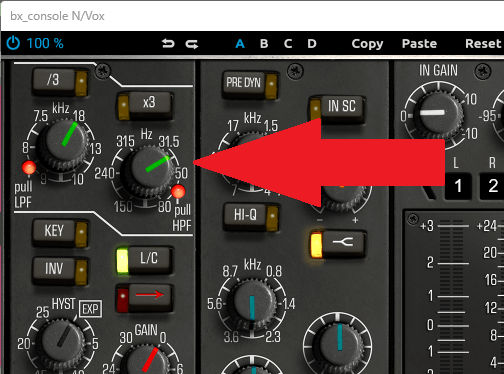
-- this is a very safe low cut (you won't cut something in your dialogue that you might want), but you may be able to safely cut higher in the 80 - 100 Hz range...
-- ultimately, you'll have to decide by testing out your low cut while listening!
-- the green knob on the left, the "LPF", should already be where you want it by default (at 18.0 kHz)...
-- but you can click the knob to be sure and it will display the number
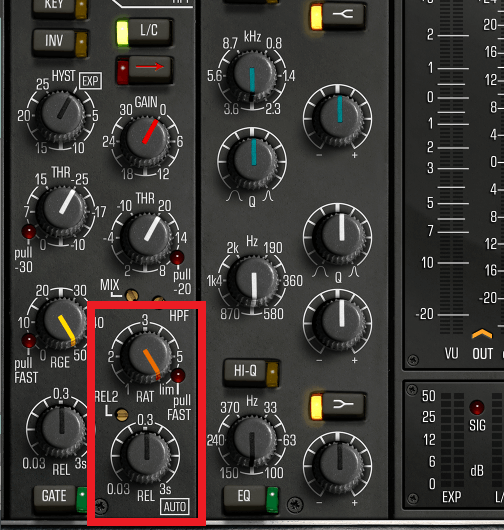
7. Finally, we come to setting the compressor section, but you'll only need to adjust the 4 knobs below:
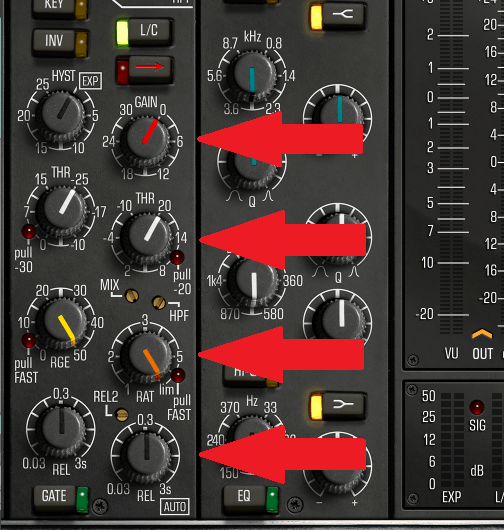
-- and two of them are "set and forget" - once you set them you don't have to worry about them!
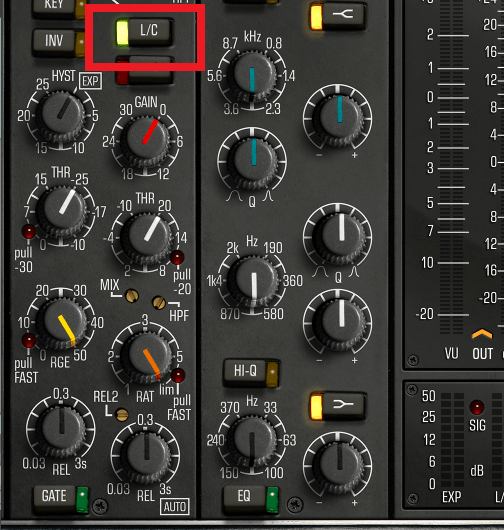
-- but first, make sure the "L/C" button is lit meaning the compressor is turned "on"
-- next, turn the orange "RAT" knob (ratio) counterclockwise to 3.0:1 (to the 12 o'clock position)...
-- 3.0:1 is a lower ratio that's good for gentle, natural sounding compression for your dialogue
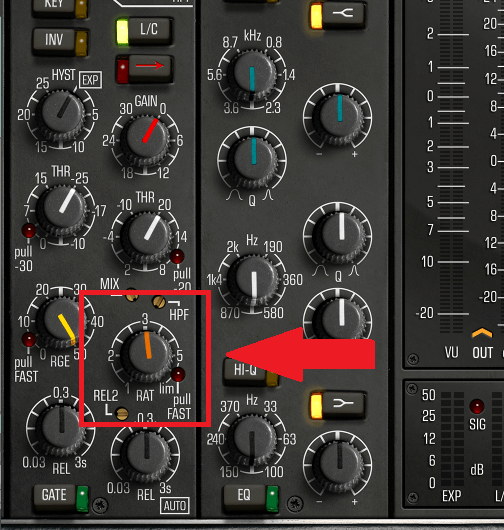
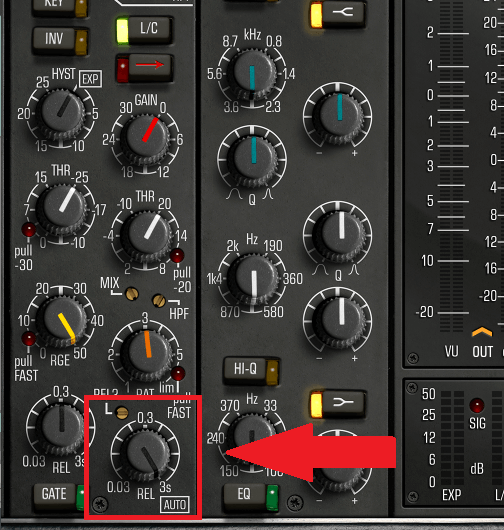
-- now, turn the black "REL" knob (release) clockwise to "Auto" (about the 5 o'clock position) and you're done with these 2 knobs
8. Now we'll set the threshold using the white "THR" knob. Play your audio and turn the "THR" knob completely clockwise (to -10.0 dB) to start compressing:

-- look at the red lights on the "L/C" meter (to the right of the compressor section) showing you how much you're compressing (gain reduction)...
-- you should see it lighting up like crazy since we're purposely over-compressing (even up to the "10" marker and beyond)...
-- listen to how your dialogue sounds - this is what over-compression sounds like...

-- next, slowly turn the "THR" knob counterclockwise until you see the L/C meter registering into the "5" marker BUT ONLY ON THE LOUDEST PARTS of your audio...
-- for my voice-over dialogue this turned out to be -2.4 dB, but this will depend on your recording...
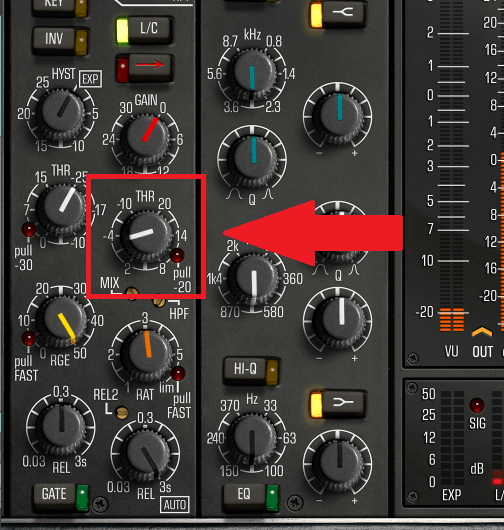
-- throughout the rest of your words, you'll want to see the red lights on the meter staying below "5"...
-- or, just barely touching the bottom of the "5" marker to avoid over-compressing

9. Now we'll set the make-up gain to recover what we lost (the gain reduction you're seeing on the "L/C" meter):
-- the idea for this compressor, and for almost any plug-in, is to set the make-up gain (or volume) so you don't hear any difference when the plug-in is "on" or "off"...
-- turn the red "Gain" knob clockwise just a few dB from "0" to set the make-up gain...
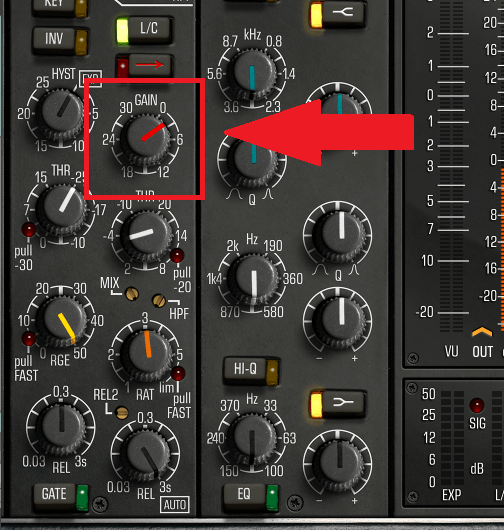
-- to test your setting, turn the plug-in "off" and "on" closing your eyes as you listen...
-- do this by clicking the blue power button at the top lefthand corner of the plug-in...

-- LISTEN closely and ADJUST the "Gain" knob to make sure the volume is similar whether the plug-in is "on" or "off"
10. Congratulations! You are a champion for making it through these steps! Give yourself a HUGE pat on the back!
-- YOU ARE NOW LEVELING YOUR DIALOGUE AUDIO AND CAN USE THESE STEPS AS A TEMPLATE TO COMPRESS ANY DIALOGUE RECORDING...
-- plus, you'll be able to hear exactly how the compressor in this plug-in affects the sound of your audio (and know when to adjust it for a better sound)...
-- and you're one step closer to mastering the Brainworx bx_console N plug-in - a powerful tool for cleaning, sculpting, correcting and sweetening your dialogue
Summary
Remember, the compressor in the bx_console N plug-in is flexible having multiple settings that can be adjusted to fit your specific spoken word recording.
Next, it sounds excellent on dialogue audio giving it a clearer more direct sound when used for leveling.
Finally, the compressor is just one of the many tools in this plug-in.
When using them all together, you have an extremely effective system for sculpting your dialogue for podcast, video or audiobook toward a professional result.
Have YOU used the Brainworx bx_console N on your dialogue audio?
Is there another plug-in that worked well for you?
Would love to hear your thoughts below!

Cheers, Bryan
Your Dialogue Editing Mentor
Transform Your Dialogue Recordings to Sound Professional
Grab My 20-page Guide Packed With Tips To Easily Improve Your Audio Today!
When you sign up, we'll send emails once every 2 weeks with valuable free content. No spam - unsubscribe at any time.


